Setting up the work environment
To be honest, the world does not really lack of node-express-mongo tutorials. This is just a simple exploration to setup a server, listen to a request, save a record to a database, and trigger an action.
Assuming that Node.js has already been installed (if not, download and install), first, we need to set up a folder for our little experiment. Next, we need to initiate npm inside that directory.
npm initThat 'init' command will help you to configure the project. When you see the prompt, 'entry point', it refers to the name of the file that you will call later to run the server. We can enter index.js(or any other name) or just press enter if index.js is already the default suggestion.
entry point: (index.js)When the project is created, after going through the prompts, there will be a package.json file in the project directory. That file contains the information that you just entered. It will also record the libraries we will install later, it will define how we run our application depending on the environment and more. But, we do not have to worry about that for now.
Let's install Express.js, the library that will help us to create our app listening to a port for external requests.
npm install expressThis action will get recorded in the package.json file under dependencies.

Also, there will be a new folder in our directory called node_modules where, from now on, the libraries we install will get downloaded to.
Creating an Express app
Create a new file called index.js in your project directory
Copy and paste the code below. This is the Expressjs hello world example:
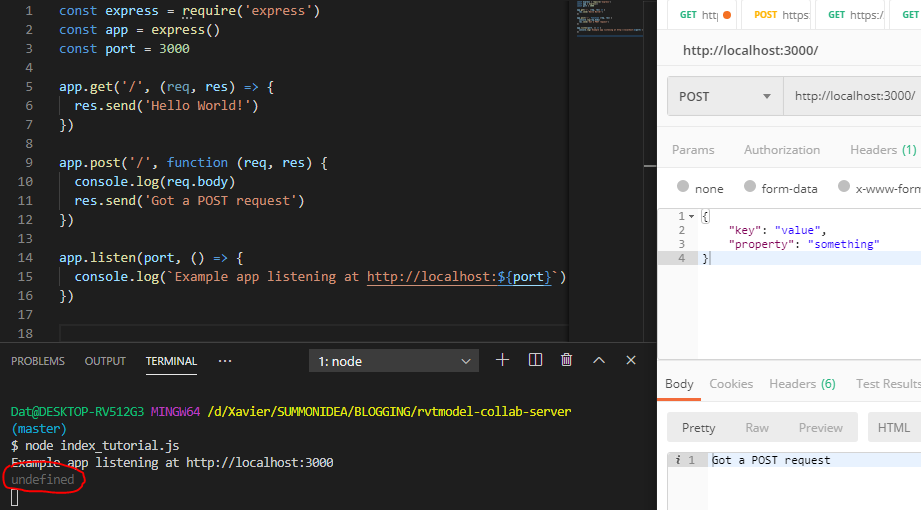
//import libraries
const express = require('express')

const app = express()
const port = 3000

//routing
app.get('/', (req, res) => {
  res.send('Hello World!')
})

//listening to port
app.listen(port, () => {
  console.log(`Example app listening at http://localhost:${port}`)
})
Save the file and using the command line run your server by executing the following command.
node index.jsIf you type http://localhost:3000/, in your web browser, you will see the Hello World! response. Also, the console will show: Example app listening at http://localhost:3000/
Now, we know how to respond to the client when they go a certain route in the app. In this case, the route is '/'. This usually translates to render HTML on the client side or send back data in a different shape.
Next, we will learn how to receive a data from the client side.
Receiving data from the client
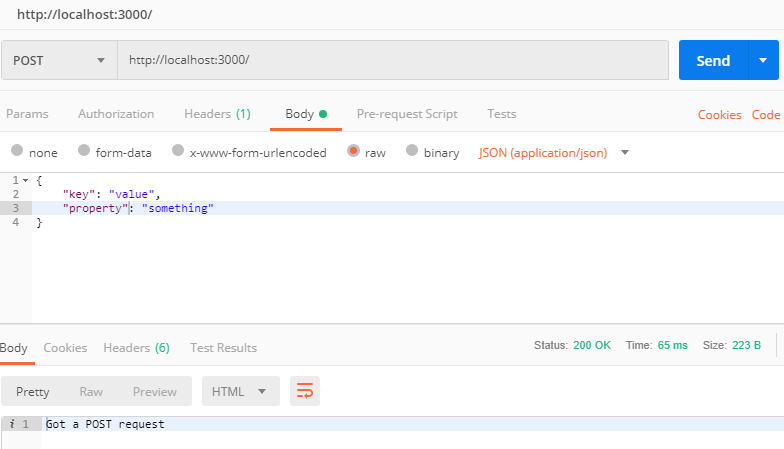
It is very common for a user to submit data through forms. Those forms usually have a submit button and that button is probably sending a POST request to the server. Thus, we will add a route to resolve POST requests for the root route '/'.
app.post('/', function (req, res) {
  res.send('Got a POST request')
})
The argument 'req' is the one receiving data inside its body. If I try to console.log(req.body) the payload that the client sent to the server, we get an "undefined" meaning that Node.js needs to translate it.
app.post('/', function (req, res) {
  console.log(req.body)
  res.send('Got a POST request')
})
To parse it, we can use: express.json()
app.use(express.json())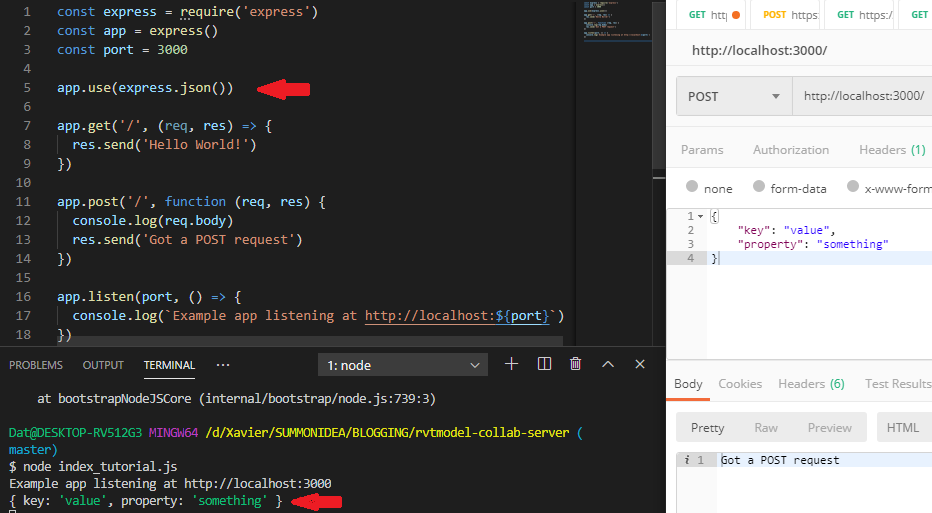
express.json vs bodyParser.json
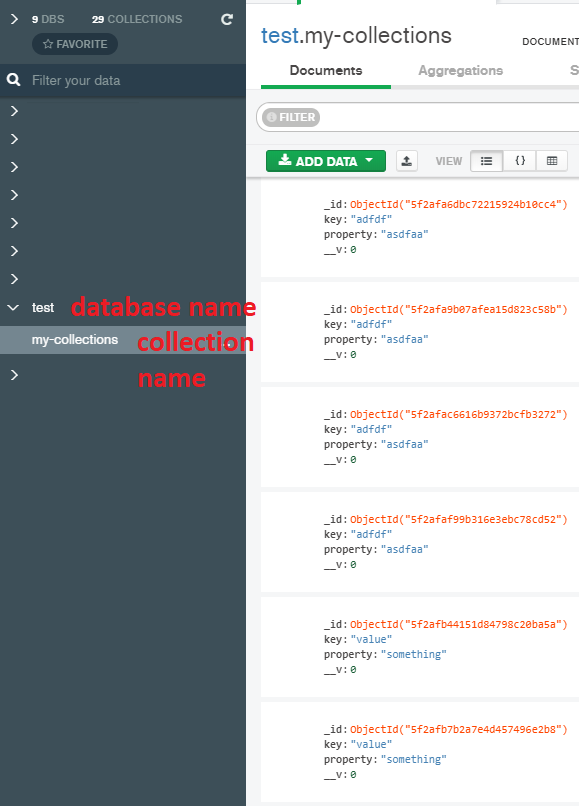
Saving to a database
We are going to use MongoDB to create a database, a collection and save as document. Install MongoDB. Also, we will need to install the Mongoose library.
npm install mongooseImport Mongoose to your code and connect to the local database.
const mongoose = require('mongoose');Connect to DB
//Connect to DB
mongoose.connect('mongodb://localhost/test', {
    useNewUrlParser: true,
    useUnifiedTopology: true});
const db = mongoose.connection;
Create an schema
//Schema constructor
const mySchema = new mongoose.Schema({
  key: String,
  property: String
});
Create a model
//Create a model
const myModel = mongoose.model('my-collection', mySchema);
Pass the data from the client and save it to the DB.
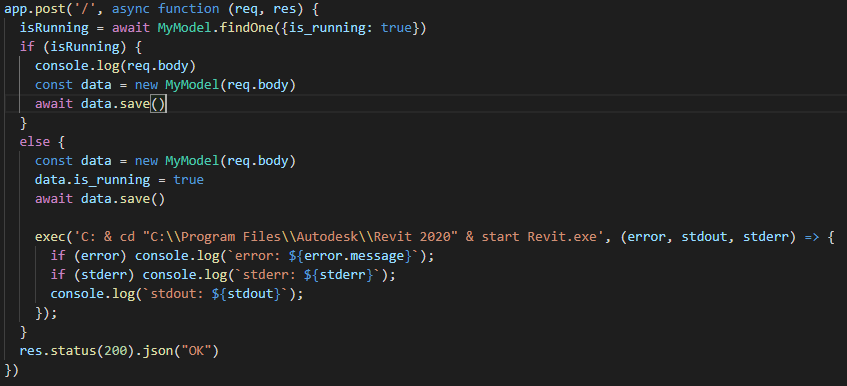
app.post('/', function (req, res) {
  const doc = new myModel(req.body)
  doc.save()
  res.send('Got a POST request')
})
Now, if we send a POST request, it will send the body below and save it to the DB.
By sending a POST request, an action has been triggered, saving a document to a DB, but we can add more after that one inside app.post.
Execute a command
The command will execute a desktop program (Notepad) using the 'child_process' library
npm install child-processGithub Repo
 GitHub
Links
https://expressjs.com/en/starter/installing.html
https://expressjs.com/en/starter/hello-world.html
https://expressjs.com/en/starter/basic-routing.html
http://expressjs.com/en/api.html#express.json
https://mongoosejs.com/docs/